Smart memos can be used to add sales and profit to your business with very little set up time. If the Sales Personnel, Customer Service Reps. or Order Entry Teams needs quick access to add on or upsell features, smart memos are a great solution.
Let’s understand the usage of this feature with an example. Suppose, I am selling lawn chair cushions since I have had them in stock for a year! They are Red in colour which was last year’s trending colour. During the sales pitch, my sales representatives have often forgotten to ask the customer if they need a lawn chair when a lawn chair frame is sold. Solution for this problem is to set up a “Smart Memo” in inventory to pop up every time that item is selected. It will remind the salesperson, when he sells certain chairs to ask about the red cushions, if they say no thank you, prompt with: “They are on sale through Friday, would you like me to send you a picture?” This at least gives the sales team a quick opportunity to sell the cushions that would have not happened before.
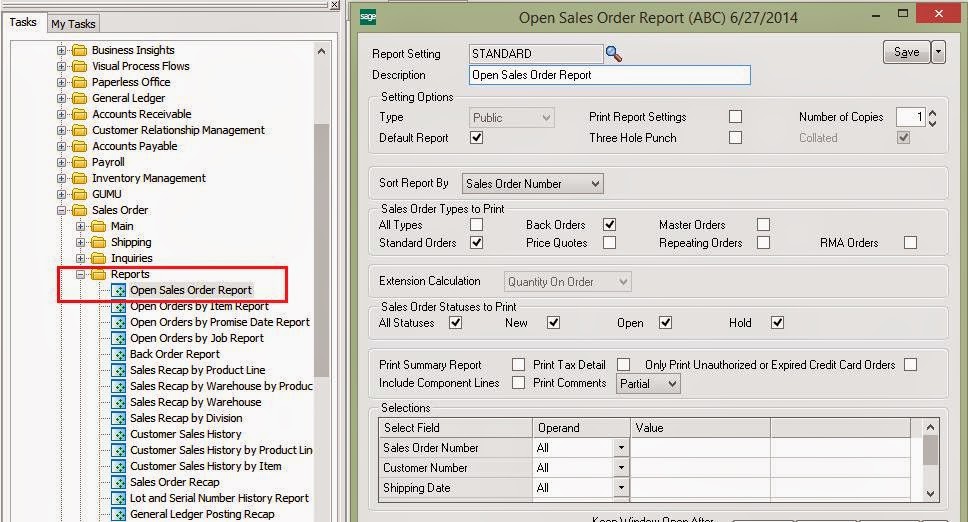
Here is a quick method for setting up smart memos in Sage 100 ERP to up sell inventory items during sales order or invoice entry. It’s an easy process and it goes this way.
1.Go to Inventory/Main/Item Maintenance
![]()
![]()
![]()
![]()
Let’s understand the usage of this feature with an example. Suppose, I am selling lawn chair cushions since I have had them in stock for a year! They are Red in colour which was last year’s trending colour. During the sales pitch, my sales representatives have often forgotten to ask the customer if they need a lawn chair when a lawn chair frame is sold. Solution for this problem is to set up a “Smart Memo” in inventory to pop up every time that item is selected. It will remind the salesperson, when he sells certain chairs to ask about the red cushions, if they say no thank you, prompt with: “They are on sale through Friday, would you like me to send you a picture?” This at least gives the sales team a quick opportunity to sell the cushions that would have not happened before.
Here is a quick method for setting up smart memos in Sage 100 ERP to up sell inventory items during sales order or invoice entry. It’s an easy process and it goes this way.
1.Go to Inventory/Main/Item Maintenance

2.Choose the appropriate item for which we want to see the note
3.Add a memo by choosing the memo manager button beside the item information.
3.Add a memo by choosing the memo manager button beside the item information.

4.Enter the notes you want to pop up during data entry and save
5.Choose the “Reminder Date” option or Always” at the drop down for Auto Display.
6.If Reminder Date is selected, choose the date the pop up starts and expires.
7.Attach a file at the “Attachment” field to have your team review other documents or pictures within the reminder.

8.Accept the choices.
9.To further clarify where the pop up happens choose the “Settings” button in the upper right hand corner and check the modules applicable.

10.To narrow down the security roles that see this pop up, go to Inventory/Set up/Memo Manager Maintenance and apply roles.
Smart Memos are an incredibly useful tool for increasing the sales.