Quantcast
Viewing all 333 articles
Browse latest View live

Migration of Sage ACT notes in Sage CRM using GUMU

GUMU™ for ACT! To Sage CRM is a wizard type utility for converting all data from ACT! into Sage CRM or Sage CRM.com. The conversion process converts all existing information such as Company, Contacts, Communications, Opportunities, Documents, Pending, History, Users, Custom information stored in the user defined locations such as notes, e-mails residing in ACT! into Sage CRM and Sage CRM.com. GUMU™ for Sage CRM utility also migrates data from Goldmine, SalesForce.com, SalesLogix or any database (including Ms Access, SQL, and Oracle) to Sage CRM (Target system).

If you would like to just export Notes from your Sage ACT System.. click to know more about our Greytrix Sage ACT! Export Notes Utility or continue reading this post.

One of the important aspects found during migrations is Notes from ACT! These are two ways how notes can be migrated to Sage CRM using GUMU.

Image may be NSFW.
Clik here to view.

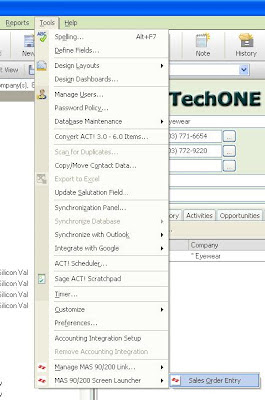
One is as communications in Sage CRM with the type as “To Do”. This is how it is generally handled in the migrations as when we create 'To Do' we get various options such as scheduling reminders, selecting an action, etc. It’s like an opportunity. All the notes information like created date, user, etc. will also get migrated into Sage CRM / Sage CRM.com (Cloud).

Image may be NSFW.
Clik here to view.

Image may be NSFW.
Clik here to view.

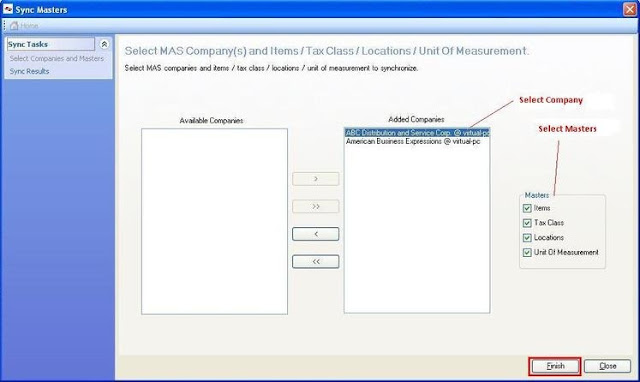
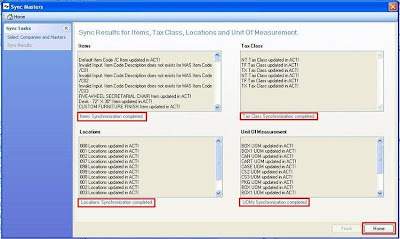
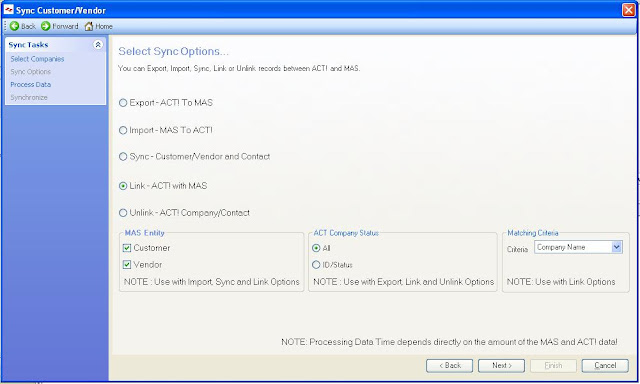
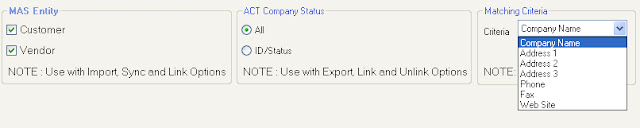
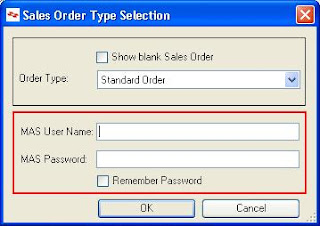
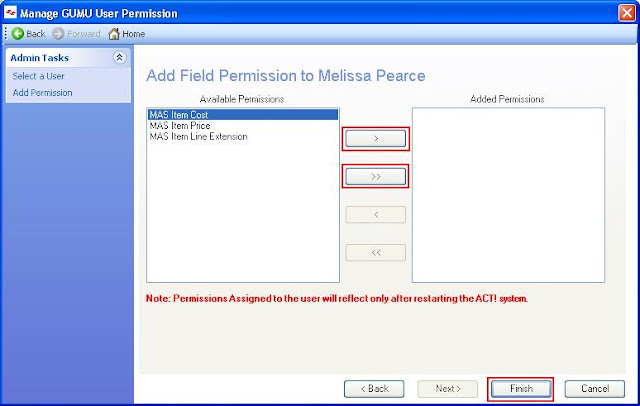
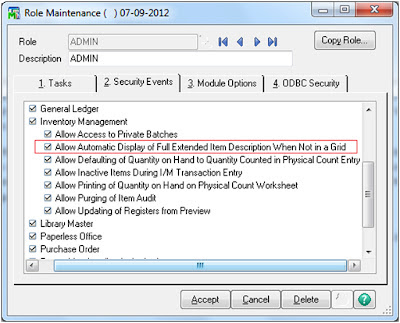
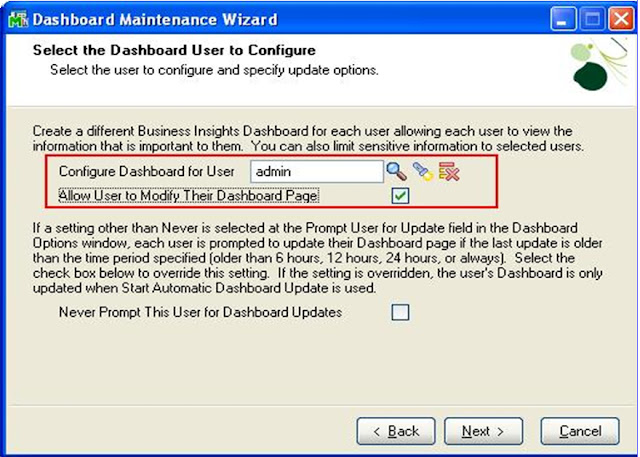
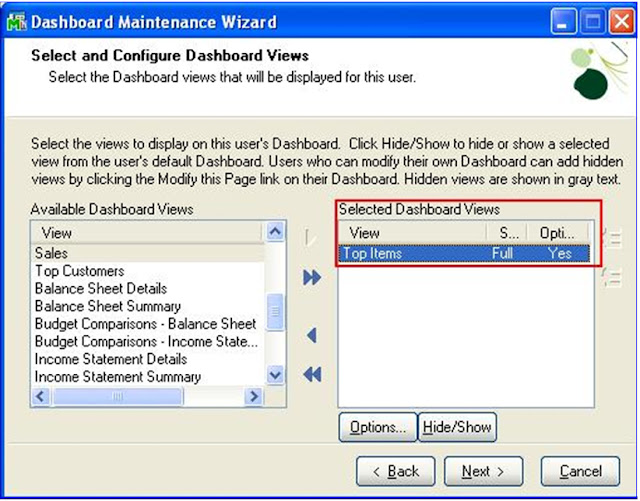
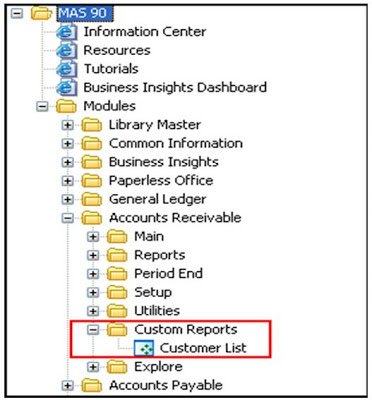
GUMU also provides the option to migrate Notes of Sage ACT! as Notes in Sage CRM. During migration, you have to select the “Notes” option from the screen :

Image may be NSFW.
Clik here to view.

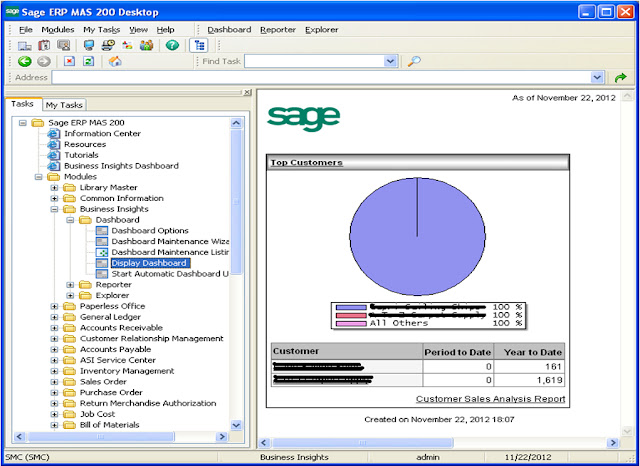
Notes are linked to the corresponding user in Sage ACT. Thus it can be migrated as notes into your target Sage CRM system in a similar way.

Image may be NSFW.
Clik here to view.


Sync Master functionality of GUMU ACT Link for Sage MAS90


Many a times, while using the GUMU ACT Link for Sage (MAS90/200) 100 ERP users come across the situation where the New created Masters such as Items, Locations, UOM or Tax Class in Sage 100 ERP cannot be viewed directly in Sage ACT! In order to view these Masters in Sage ACT!, users need to make sure that all the data from Sage 100 ERP are synced into Sage ACT!. Thus, for Synchronization users can use “Sync Master” Option available in Sage ACT!  for Syncing these Masters by following these simple steps for Synchronization:

- Login to you Sage ACT system with Admin Credentials where GUMU ACT link is installed. Go to Tools > Manage MAS 90/200 Link > Sync Masters.

        - Sync Masters screen will open. Select the Company and Masters such as Items, Tax Class, Locations and Unit of Measurement which you would like to sync and click Finish button.

- Once the Synchronization process is completed, user will get the message “Synchronization completed” for the particular Company/Master selected. Click on Home button to proceed further for use of GUMU ACT! Link.
Following this easy and simple process user would be able to synchronize and view all the New Masters created such as Items, Locations, Tax Class and UOM in Sage ACT! from Sage 100 ERP.

AR Invoice Adjustment Entry in Sage 100 ERP


When creating Invoices, many a times we come across a scenario where we need to modify an Invoice but since the Invoice is already posted we cannot modify the same. This is default behavior in most ERP system for security purpose, to work around the error we then need to reverse the Invoice by creating Credit Note and then re-create the Invoice this will generate a new Invoice Number.
Lets see today “Invoice Adjustment” feature in Sage 100 ERP (Sage MAS 90/200) through which we can change the Invoice. Hereby we can enter the missing details to the existing Invoice without creating a new invoice and most importantly using the same Invoice Number.
To create an adjustment entry to the A/R Invoice we need to follow the below steps:
1) Go to Accounts Receivable > Main > Invoice Data Entry
2) Enter the existing Invoice number for which you need to make adjustment.
3) On entering the Invoice number below message will pop up.


4) Click on OK and Continue.
5) Select the Customer Number for which the invoice needs to be adjusted.
6) On entering the Customer Number below message will pop up.

7) Click on Yes and continue.
8) Add the Line Details to the invoice with which you need to adjust the Invoice.
9) Accept the Invoice and then post it.
Now, you may notice that a new line item is adjusted with the existing invoice number and other details for the same Customer. The adjusted details can be viewed through Customer Maintenance on the invoices tab.


GUMU ACT Link for Sage 100 ERP


GUMU™ ACT! Link for Sage 100 ERP, integrates your Sage ACT! and Sage (MAS 90/200) 100 ERP systems on a real time basis. So the changes made into a particular system get reflected into another system and vice-a-versa on a real time basis. As a result, your front office is well connected to your back office with accurate data on their fingertips.When a User/Salesperson logs into the Sage ACT! System, they can view three tabs mentioned below, wherein they can view the data from the Sage 100 ERP on a real time. 

     
       1. MAS Entity tab: In this tab users get the detailed information of customer/vendor similar to Sage 100 ERP. User/Salesperson can view the Main, Additional and statistics block along with data from Sage 100 ERP on real time basis. They can even perform various action related to the record like linking, un-linking or promoting as a new customer.


2. MAS Register tab:  It displays a list of Invoices, Sales Order and Customer Item Purchase History etc. Selecting the particular Register type and dates will provide user/salesperson with their basic information. They can select and drill down to view the details.


3. MAS Aging tab: This tab provides with the ageing details of the customers or vendor. It will display the invoice number and other details for the aging date selected. You can even drill down further to view details.


Some key Features of GUMU™ ACT! Link for Sage 100 ERP:
  • Supports Both Customer as well as Vendors.
  • Integrate multiple companies of Sage 100 ERP with a single instance of Sage ACT!
  • Auto Linking records between ACT! And Sage 100 ERP based on Matching Criteria & ID/Status.
  • Enhanced Security feature -  Provides better control to the “Administrator”
  • Launch Sage 100 ERP Sales Order Entry Screen from within Sage ACT!
  • Real Time Viewing of MAS Aging, Customer and Vendor Transaction in Sage ACT!
  • Creates Sage ACT! Opportunity and promote it as a Standard, Quote, Back or Repeating Sales Order in Sage 100 ERP with update Item Pricing based on Customer Price levels.

    Visit our website to download a Full featured 30 days trial before you commit to purchase.

Sync Options in GUMU ACT Link for Sage 100 ERP Integration


GUMU™ ACT! Link for Sage 100 ERP is a painless utility for a smooth integration between Sage ACT! and Sage 100 ERP (i.e. Sage MAS 90/200). With a wide range of user friendly and easy to use features, it provides a seamless integration experience of your front and back office. It also provides you with various Sync options that guide users to easily synchronize data in both the systems on real time basis.
It links Sage ACT! and Sage 100 ERP on the basis of various criteria such as Company Name, Address, Phones etc.
Further, users can Export Sage ACT! Company’s data to Sage 100 ERP, which are not present in Sage 100, by filtering on the basis of ID/Status or all at once. Similarly, one can Import Sage 100 customer/vendor details that are not present in Sage ACT!
The Syncoption allows users to synchronize Customer/Vendor and contact on the basis of Sync options set for the flow of data in Manage MAS Connections.
Whereas, the Unlinkoption will unlink the Company, contact that are linked. As a result, GUMU™ Sage ACT! Link is a must for small and medium enterprises for being competitive and a step ahead in the business process.
To know more about the GUMU™ ACT! Link for Sage 100 ERP or have any queries, write us on sage@greytrix.com


Promoting Sage ACT Opportunities as Sage 100 ERP’s Sales Order


GUMU™ ACT! Link has various vibrant features that are needed by an organization to grow and flourish in their respective fields. It’s a customized tool that is blended into your business as per its unique business model. Thus, making it one of the must have for businesses using Sage ACT! and Sage MAS.
The feature in discussion here is “Promoting Sage ACT! Opportunities as Sage 100 ERP Sales order” from within the Sage ACT! As a result, your front office is well connected to your back office, with the updated information in hand.
To Promote Sage ACT! Opportunities in Sage 100 ERP aka Sage MAS 90/200 ERP, users need to perform the below mentioned steps:
1. Select a linked Sage ACT! Company. Example:Say its “American Business Futures”.
2.    Then, select a linked contact from the Contacts Tabs in the Company.
3.  In Contacts, go to the opportunity Tab and create a “New Opportunity”
4. While creating the opportunity, go to Product/Services Tab and click on ADD button.
5. Fill in the details in the Add/Edit Product screen and click on OK.
6. Once the Product/Products are added to the screen, go to the MAS Sales Order Tab.
7. In MAS Sales Order tab, you can view the details of the order such as Bill to address, ship to address, total amount, terms etc. Select the type of order from the dropdown.
8. Once the order is confirmed, click on “Promote SO to MAS” option to promote the opportunity from Sage ACT! to Sage 100 ERP.
Following the above simple steps, users would be easily able to promote a new opportunity in the Sage 100 ERP as a Sales order. For information on our GUMU™ ACT! Link for Sage 100 ERP, write us on sage@greytrix.com


Change Items Code in Sage 100 ERP


Greytrix under its brand name “GUMU”, a Sage Certified migration solution for Sage 100 ERP (aka Sage MAS 90/200) has developed a range of migration utilities which assist in data migration of Sage ERP and Sage CRM solutions.

Currently, we migrate data at FIXED COST forMasters and Open Transaction as well as Complete History to Sage 100 ERP from QuickBooks and Sage 50 (Peachtree). 

As part of our migration process, we ask users to fill in a mapping sheet with details of how they would like their customers/vendors/items/etc numbered/named in Sage (MAS90/200) 100 ERP from QuickBooks, Peachtree, etc.

Many a times there are situations where customer may miss changing codes or had provided a wrong code and realizes this later after migration. For e.g. as per mapping sheet we had assigned code ITM001 to Item name ‘Standard Keyboard’ which was supposed to be as ‘IT0001’. As a result “Re-migration of Inventory module” to correct this will be a time consuming process. 

To overcome such issues, customers can utilize the Sage 100 screen named as ‘Delete and Change Items’ under Inventory Management. It allows deleting the items from Sage 100 Companies and to change the existing Item’s code in Sage 100 ERP.

The change option helps to change the Item Numbers quickly and all information, including transactions will be associated with the new Number in all modules of Sage 100.

Several operations which are included in this utility are explained in below procedure;

1. In Sage 100 ERP, go to Modules>>Inventory Management>>Utilities>>Delete and Change Items.
2. Select the Delete and Change Items option and a screen will get displayed.  Select the Change Tab in the Screen
3. In the Starting Item Code column, select the Item Code which you want to change to a desired Item Code. (E.g. If I wish to change the Item Code ‘ITM001’ to the Item Code ‘IT0001’).
4. In the Ending Item code column,   you can see that the particular selected Item Code will automatically get selected.
5. Now enter the new Item Code in the New Item Code column. For e.g ‘IT0001’ and Click on ‘Proceed’ Button. You will get a window, click on ‘Yes’ button to proceed further.

6. The printing, message will pop up on screen. You can select the printer and click on ‘Print’ Button for printing the screen of Item Change.
7. After closing the report screen, another window will pop up which will ask you to continue with the process or not. Click on ‘Yes’ Button for reflecting the changes made into the Item code.
8. After completing the changing code procedure, it will ask to print the ‘Change Items Log’. Select the printer and click on ‘Yes’ button for printing the Log.
9.  After printing the log you will get the window, which will ask to clear the change Item Selection Criteria or not. Click on YES to clear it or NO to save the criteria.

Thus, the old Item Code will get replaced by the new one and this change will get affected at transaction level as well. 

AP Invoice Adjustment Entry in Sage 100 ERP


In our last blog we discussed about “AR Invoice Adjustment Entry in Sage 100 ERP”.Today we would see “AP Invoice Adjustment Entry” feature in Sage 100 ERP (Sage MAS 90/200 ERP) through which, we can change the Invoice. Thereby we can enter the missing details to the existing Invoice without creating a new invoice and most importantly using the same Invoice Number.

We need to follow the below steps to apply an adjustment entry on A/P Invoice;

1. Go to Accounts Payable >> Main >> Invoice Data Entry
2. In the A/P Invoice Data entry window, at the vendor no. field, enter the vendor number and existing Invoice number for which you need to make adjustment.
3. On entering the Invoice number below message window will appears.
4. Click on Adjust and Continue.
5. In the A/P Invoice Data Entry window, at Adjustment Amount field, enter the adjustment amount to the invoice which you want to adjust in the Invoice.
6. Click on Accept button. Thus invoice is adjusted.
7. Print and update invoice register and the daily transaction register in AP invoice register window.
Now, you can notice a new line item is adjusted with the existing invoice number and other details for the same vendor. The adjusted details can be viewed through vendor Maintenance on the invoices tab.


How to check if screen is customized in Sage 100 ERP


Many a times, while undertaking the customization of Sage100 (MAS 90/200) ERP, we are required to determine the additional customization's done to the screen. For this, Sage has provided a less talked and most frequently used functionality, through which we can get the basic of all customization details under one hood.
To check the customization's applied to the screen, you just need to open the screen (to be modified) in the Sage 100 (MAS 90/200) ERP and right-click on the panel area between the groups, a pop-up will appear [refer the screenshot below].
Click on the “System Info” label, to view details of the customizations that we require.
Now, as we got the details of existing modification, we can start with our modification/customization.
If you have any queries on Sage 100 (MAS90/200) ERP customization or data migration/integration, you can mail us at sage@greytrix.com


Re-configuring GUMU ACT Link


The myriad features of GUMU™ for Sage ACT! – Sage 100 (MAS 90/200) ERP Integration makes it indispensible when it comes to integrating Sage 100(MAS 90/200) with Sage ACT!

Most of us get the Link running the very first time (generally, for Testing purpose), as GUMU™ Act link installation is a easy and straightforward wizard driven setup. However, one might face few hurdles while configuring the Link for other tasks like live deployment, deployment on another machine or reinstallation. This blog provides an insight for reconfiguring the GUMU™ ACT! Link without any Technical Support.

Below mentioned are steps to setup and configure GUMU™ ACT Link;

1) Install MAS side setup on MAS Server.(If not already done)
2) Install ACT! side setup on ACT! Server and all ACT! workstations. (if not already done.)
3) On MAS Server, Open MAS90200 Configuration screen from “Start>>All Programs>>Greytrix>> GUMU ACT! Link".
4) You can now add a Connection for a MAS Company (to be accessed in ACT!) by clicking on ‘Add New Company’
5) Fill in the required details along with the live MAS Company code in ‘Company Code’ box. After successful ‘Test Connection’ click on ‘Save’ and you have completed the MAS Side configuration for the Live MAS Company.
Note: If you want to delete the old test/dummy connection, then first unlink all the customers and vendors in ACT! which are based on the old dummy connection. Then you can delete the dummy MAS Connection on this screen.
6) Now, let’s move to ACT! side configuration. Before moving forward, it is advised to take a backup of the live ACT! and MAS database. Then, Start ACT! with ‘Live’ database and you would be prompted to enable the Link. Click ‘Yes’, it will take few minutes to complete the process. [You will get this message only for the first time after your have installed the link]
7) Once you get into ACT!, go to Tools >>Manage MAS 90/200 Link >> Connections.
8) This would be a blank screen as you are setting up the link for the first time on this database. Click on ‘Create New Connection’ from Menus on Left hand side of the screen.
9) Here, just enter MAS Server Name or IP address. Click on ‘Test Connection’.
10) On successful ‘Test Connection’, you should see the live MAS Company Name in the result box.
11) Click on ‘Next’ and set ‘Sync Options’. Finally click on ‘Finish’
12) Restart ACT!
13) Navigate to Tools >> Manage MAS 90/200 Link >> User Permissions.
14) Assign desired permissions to users. (Especially current logged in User)
15) Click on ‘Finish’ and Restart ACT!
16) Now, you should see the MAS tabs on the ACT! Company and contact screen (if the current user has been assigned the required permissions)
That’s it! GUMU ACT! Link has been setup and configured. Now you can use any of the GUMU ACT! Link features.
Note:
These steps are to be done on the ACT! Server database. If all users are using the same database located on the Server, then there is no need of further configuration. Users just have to login and start using the Link.
For more detail related to GUMU™ ACT Link, contact us at: sage@greytrix.com 

Calling Customized Sage 100 ERP SO screen through GUMU ACT Link


GUMU™ ACT! Link is a customizable utility and can be customized as per specific business requirement that can suite the flow of the businesses, making it an “Imperative Part” of the organisation.

There was a case, wherein we were asked to call up the Customized Sage 100 (MAS 90/200) ERP SO Screen in ACT!

As GUMU ACT! Link earlier used to show standard Sage 100 (MAS90/200) ERP SO Entry screen in Sage ACT! irrespective of the changes made to the screen and customized as per the users roles. Thus we made changes to our GUMU ACT! Link and now it’s able to pull up the Customized SO Entry screen based on the user’s login details from Sage 100 in Sage ACT!

To view the customized SO screen user needs to install the new setup of GUMU™ ACT! Link and follow the below mentioned simple steps;

1. Open Sage ACT! Company for which you have activated the GUMU ACT! Link
2. Navigate to Tools >> MAS 90/200 Screen Launcher >> Sales Order Entry menu.
3. Users will now see a Sales Order Type Selection Screen. Fill in the Order type and Sage 100 (MAS90/200) ERP credentials. The customized Sales Order screen will be called based on the entered details. It also has the option of allowing user to save the MAS credentials by clicking “Remember Password” checkbox, so that users don’t have to enter the credentials each time the Customized SO Screen is launched from ACT!
Note: If users don’t enter Sage 100 (MAS 90/200) ERP credentials in the screen, then the default Sage 100 (MAS90/200) ERP credentials that were used in “MAS90200 Configuration” will be used to pull up the SO Entry Screen.
Hope the new feature is of great help to the users.
To know more about the GUMU™ ACT! Link, write us atsage@greytrix.com

Enhanced security for sensitive data of GUMU ACT Link


User friendliness is the key for success in an application. But, in today’s time we cannot neglect the Security feature where the data security is utmost importance. Hence, customers are more attracted towards software application which provide a rich set of Security Features and are User Friendly.

Earlier GUMU ACT! Link only had tab level security option such as MAS Register, MAS Entity, MAS Aging, Order Promote, Screen launcher, etc. But now it has a newly added feature of field level security for Item Cost, Item Price and Item Line Extension fields on MAS Register and MAS aging tab in order to avoid unauthorized users to view these fields.

By default, no ACT! users will have access to listed fields on Sales Order Line. In order to make these fields visible, “System Administrator” will need to follow the below given steps and provide the necessary privileges to the users;

1. Login to the Sage ACT! Company with the GUMU ACT! Link. Navigate to Tools >> Manage MAS 90/200 Link… >> User Permission menu.
2. Select User for which the field will need to be visible and Click Next button.
3. Select the Standard defaults in the “Add Permission to User” screen, click Next button.
4. Now you can assign permissions to the users (In our case it’s Melissa Pearce) for the Fields visibility by selecting single options from Available Permission list and Click on (“>”) button or else click  ALL (“>>”) button to assign all permission for the selected user and click on Finish button.
5. You will now return to the “Select User” screen click the Close button. Log-off the users (if someone is logged in) and restart the Sage ACT! application.
6. Ask the user (Melissa in our case) to login and check if she is able to view the field of Sales Order Line by document link on MAS Register tab.
Hope you got the idea as how to use the security for the link. However, if you have any query or want to know more about the GUMU™ ACT! Link, write us atsage@greytrix.com

Export data from Sage 100 ERP using Visual Integrator Job


Almost all enterprise systems available in market provide some kind of import and export data to/from the system. Likewise, Sage 100 (MAS 90/200) ERP provides a powerful mechanism to import/export data through Visual Integrator. In VI, one needs to create Jobs (import/export) as per his/her needs.

We would be discussing, as how one can export data using VI Jobs. Generally, VI supports connections such as ODBC, CSV, ASCII, etc. keeping logic, and selection criteria intact for the jobs.

To create Export Job follow below mention steps: 

1. Start Sage 100 (MAS 90/200) ERP system and navigate to MAS 90 >> Modules >> Visual Integrator >> Main >> Export Job Maintenance.
2. You will see “V/I Export Job Selection” screen. Enter Export Job Name in “Job Name” field and select Table Name from lookup, for which you want to export data and click Accept button.
3. A prompt will appear “Whether it is a new job.” Click on Yes button to continue if it is a New Job (Or you can use the previously set jobs to Import/Export).
4. You will see “Export Job Maintenance” screen. Navigate to “Configuration” tab and enter description in “Long Description” field, select “File Type” and browse file in which you want to export data.
5. Then the “Data” tab, select required/desired fields from “Available Fields” using “” button i.e. “Add Selected Field” button.
6. In “Select” tab, you can apply filter for the fields.
Select those fields, on which you want to apply filter. Double click on the selected field and you would be able to see the below screen.
 Set the conditions accordingly and click on Accept button.
7. In “Sort” tab, you will have options to sort (Ascending/Descending) order.
8. Thus, creation of Export Job is completed and is ready for execution. To execute, click on Acceptbutton, it will prompt for “Execute this Job?” click “Yes” to continue.
9. You can directly execute this job by clicking Accept button or else can test by clicking on Test button.
10. Once the execution is completed, you will get Export summary screen. If you want to view job log file you can click “Yes” button or else click No button.
As a result, Visual Integrator jobs is created, and could be executed multiple times for Exporting data into Sage 100 (MAS 90/200) ERP, making it useful and time saving module for the Users. Similarly, users can create Jobs for importing data into Sage 100 (MAS 90/200) ERP.

--- Related Post ---

Disable Extended Item Description Pop-up While Navigating through Items


Extended Description is one of the notable features that Sage 100 (MAS 90/200) ERP has to offer. This feature helps to record additional information/description of the items to describe items in better manner. Though it is a very helpful feature, sometime it is annoying, as it pops-ups the extended description screen while moving/navigating through the items in Item Maintenance/Enquiry screen.

This blog aims to assists Sage 100 users as how to enable/disable the display of the Extended Description option. You will be able to add/view extended description after disabling this option; just that it won’t popup automatically.

To disable the pop-up feature, you can just de-select the option “Allow Automatic Display of Full Extended Item Description When Not in Grid” under the Inventory Management (I/M) available in the Role Maintenance screen. 

You can follow the below mentioned simple steps to disable the pop-up;

1. Login to the Sage 100 System with Admin credentials and open the Role maintenance screen.

2. Un-check the option “Allow Automatic Display of Full Extended Item Description When Not in Grid” and save the role.
3. Now, re-start the Sage 100 system so that the Role settings can take effect.
4. Everything is set; you can now navigate through the Items without getting the Pop-up.

With these simple settings Admin users can stop the pop-up of the Item Description screen in Sage 100 ERP.

Print Invoice in MAS Register with GUMU ACT Link


Now that the new and improved Sage ACT! 2013 is out. We have not only enhanced our GUMU™ ACT! Link to make it compatible with Sage ACT! 2013 but have also added new features to the utility which an organisation must have at its disposal. 

To provide customers with more benefits of GUMU ACT! Link, we have added new feature of “Print Invoice” on the MAS Register tab that gives them an option of printing the sales invoice directly from ACT! System. This Functionality is available for both AR and SO Modules. 

This feature will reduce the processing time that includes printing of invoice for ACT! users. Once a drill down is made for a particular record from the list, the user would be presented with the “Print” button at the top of the drilled down tab/screen. On this drill down user would also able to view the module to which the Sales invoice belongs to. 

A quick look at the Print Invoice button and the display of the module to which the transaction belongs on the MAS Register; 
Below screenshot display the invoice preview option which is available after clicking on the “Print” button. 


Note: Sage 100 ERP Workstation must be installed at the ACT Side system for using this feature.

--- Related Posts ---

1. Calling Customized Sage 100 ERP SO screen through GUMU ACT Link
2. Enhanced security for sensitive data of GUMU ACT Link

To know more detail related to GUMU™ ACT Link, contact us at sage@greytrix.com.

AR Prepayment Entry in Sage 100 ERP

Generally, users prepay an Invoice or apply cash/credit card payment against an Invoice that Sage 100 (Earlier known as Sage MAS 90/200 ERP) system does not support. Thus, in this blog we would see how to create AR Prepayments in Sage 100 ERP.
By following some simple steps in Sage 100 ERP, users would be able to create a prepayment AR entry, which will help with the payments that could not be matched with a specific Invoice, or of any advance payment which is received before an invoice is issued.
Such transactions are recorded as an Invoice with a credit balance i.e. after an Invoice is issued for which prepayment is made partly or fully. Thus the prepayment amount would get deducted/reduce or nullified from the Invoice balance.

To create AR Prepayment Entry in Sage 100 ERP, follow the below mentioned steps:
  • Select Accounts Receivable Main menu > >Cash receipt Entry.
  • In cash Receipt Entry, enter the Customer number with check number and the amount prepaid in the Amount Received field.
  • Navigate to Lines tab, and enter a future Invoice Number and click on tab. A dialog box will appear asking you whether the transaction is a prepayment.
  • Click on “Yes” and “Accept” button to record the transaction.
Thus a Pre-payment entry is created for a future Invoice.
Note: Use this same Invoice number while creating an invoice for this customer; enabling system to apply the pre-payment to the Invoice automatically.
Sage 100 System is designed to match Invoice number with the extension -PP to the same invoice number with the extension -IN or -DM. By using same invoice number for prepayment and Invoice, now Users will not need to manually apply these Invoices using Cash Receipts Entry.

Printing Invoices from Sage ACT using Sage 100 ERP Business Object Interface

In our quest to make GUMU ACT! Link for Sage 100 (MAS 90/200) ERP Integration a better tool; we have been implementing numerous suggestions from our Business partners and clients. One such suggestion was to have a Print Invoice feature from Sage ACT! This is an interesting functionality and would take GUMU™ ACT! Integration Link one step ahead.

Easy it may sound; but development of this feature was not a cakewalk. After lot of R&D by our team we were able to implement this feature finally with the help of Sage 100 ERP Business Object Interface (BOI).

We would like to share a snippet of our code that we have used to implement the print invoice functionality in our GUMU™ ACT! Link.

Hope this would be helpful to you and would save your time.
--- Related Posts ---

Create Dashboards using Business Insights module in Sage 100 ERP


As organizations grow, they tend to feel the requirement of various reports, features that enhance their decision making capabilities with utmost accuracy so they can grow in their workspace. Considering these things, Sage 100 ERP (earlier known as Sage MAS 90/200 ERP) has been empowered with a module i.e. “Business Insights” that cover these points. Using this module, users can create Dashboards, reports, etc. according to their requirement and can make most out of it.

Say for an instance; In Sage 100, we create a dashboard and want to set it as per each user needs or as per their department they work for, and want to view information such as Most sold items, Top customers, Top vendors, etc.

To illustrate, let us assume that we want user to see the “Top Items” in the dashboard. To set the dashboard for the user, “Administrator” has to follow the below steps;

1. Login to Sage 100 company file as an administrator and navigate to Business Insights à Dashboards and click on the “Dashboard Maintenance Wizard“, a welcome screen will appear. It will appear only if you do not have any custom report in the Sage 100 System.

2. Click on “Next” button of “Welcome Screen”, a screen will appear to select user (i.e. in our case we would be selecting admin as a User) to whom we would like to display the Top Items information.

3. Now click on “Next” button to select the information (i.e. “Top Items”) that you want to show in the dashboard.
4. Click on “Next”, a confirmation screen will appear where click on “Finish” button to complete the set-up. Check all the details and click finish to generate the dashboard. Everything is set, now when user login to Sage 100 dashboard he would be able to view the dashboard.
Similarly, Administrator can provide rights to view vital information through Dashboards in Sage 100 Screen to users depending on their requirement. Users can refer these dashboards to make quick and accurate business decisions.

Create Custom Reports in Sage 100 ERP using Business Insights


Success of an enterprise system mostly depends on the variety of reports it can generate in order to fully scrutinize and make correct business decision. At times, it so happens that the users tend to feel, that some reports are not as per their requirement and they want to modify it. For this purpose, Sage 100 ERP (earlier known as Sage 90/200 ERP) has provided a module “Business Insights”.

With help of this module, reports can be created for every module,customized, or can even modify the existing reports by following below instructions.

In order to create a custom report, there are certain pre-requisites which Users needs to fulfill before starting:

1. User need to have Business Insights installed on his Sage 100 System.
2. User need to have at least one report in the Sage 100 system.
3. Crystal Reports must be installed on machine.

Let take an example, say we want to create custom report which will show “Customer List”. Thus to create customized reports follow below mentioned steps…

1. In Sage 100 ERP, Navigate toBusiness Insights -> Reporter-> Business Insights Reporter, and click on Create Report button on the Business Insights Reporter window. A window would appear containing all the customized reports created previously on the system. However, if customized report does not exist, then Welcome page of the Business Insights Reporter Wizard will launch. Proceed through the wizard to create report. Click on next button, for creating report.
 
2. Give name and description to reports; select module for which report will belong and click on Next button.
3. Now window will appear where user needs to select information they want to show in the report, after selecting the option click on Next button.
4. Now, select fields that you want to see on the report
5. Select fields on which you want to sort the reports.
6. Select the report group.
Hence, Report creation is finished. In our next blog, we would be discussing about adding features to report such as filter, security etc.

Adding Filters and Security to Custom Reports in Sage 100 ERP


In our previous blog, we discussed about Create Custom Reports in Sage 100 ERP using Business Insights, nowlet us discuss about adding filters and security to the custom reports in Sage 100 ERP (earlier known as Sage MAS 90/200 ERP).

Follow below mentioned steps to add filters and security to the Custom reports in Sage 100 ERP;

1. After report creation is completed, click on Next and Select filter you want to add to your report. Only those fields will be available for selection which you have selected in the earlier screen for showing on the report.
2. Select other relevant report options.
3. Select report, if you want to print multiple report.
4. Select role, which you want to show in the report, through this you, can manage the security as who would you like to see this report and click on Next button.
5. Click on the Finish button to generate report.
6. Once report is generated, below screen would appear (like any other report screen)
7. Click on “Preview” button to view reports.
8. You can also view report name under “Custom Reports” menu in the Accounts receivable module.
In this way, Users can create their own report in Sage 100 ERP using Business Insight Module.
Viewing all 333 articles
Browse latest View live