Quantcast
Channel: GUMU™ Integrations – Tips, Tricks and Components
Viewing all 333 articles
Browse latest View live

Assign Item Price based on Cost and Quantity in Sage 100 ERP

$
0
0

Scenario: Mr X wants to assign Pricing to Items based on cost and quantity of items rather than using just standard and retail pricing for Items in Sales Order. How he can make profit from Item sales, when Item Cost exceeds the Standard Cost of Items?

To handle such scenarios inSage 100 ERP (earlier known as Sage Mas 90/200 ERP), they have provided a unique Pricing Code feature, which calculates Item Price based on Cost, Discount and Quantity. Thus, navigate to Sage 100 >>Inventory Management >>Setup >>Price Code Maintenance.

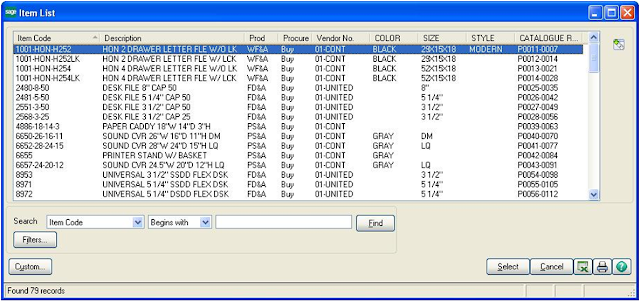
In Price Code Maintenance: Enter a price code representing the Pricing group to add or maintain, or click on Lookup button to list all price codes. Price codes can be assigned to any number of items in Inventory.

Description: Type an appropriate description for the Price code.
Price Level: If it’s a new entry, default Price level appears. If standard price level information for a price code has already been established, users can create additional price levels. Click on Lookup button to list all Price levels established for Price code. If users delete the standard price level, all price levels for the Price code are deleted. Users can delete specific non-standard price levels for Price code without deleting entire price code.

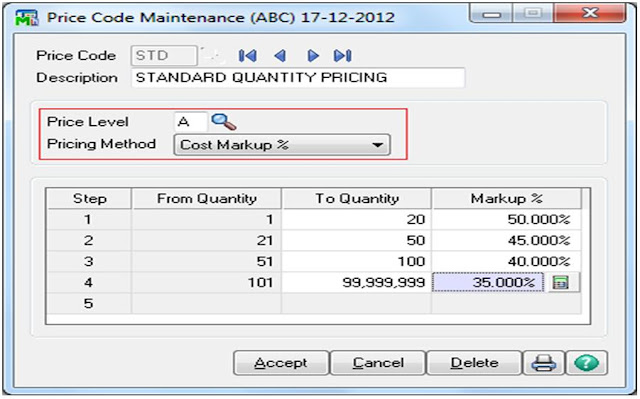
Pricing Method: Users need to select method for calculating Price for item.

* Select Cost Mark-up Amount to add dollar amount to the item’s standard cost. In this case, Price will be calculated as Standard cost of Item + Entered mark-up Amount.
Select Cost Mark-up % to add percentage of the item’s standard cost to the item's standard cost. In this case, Price will be calculated as Standard cost of Item + Entered mark-up percentage of the Cost.
Select Price Discount Amount to subtract dollar amount from the item’s standard price. In this case, Price will be calculated as Standard cost of Item - Entered Discount Amount.
Select Price Discount % to subtract a percentage of the item’s standard price from the item's standard price. In this case, Price will be calculated as Standard cost of Item - Entered Discount Percentage Amount of Cost.

To Quantity: Type the maximum quantity for each quantity break, or click Calculator button to enter a quantity using the calculator. Mark up Amount / Mark up % / Discount Amount / Discount %.

If Cost Mark-up Amount or Cost Mark-up % is selected at the Pricing Method field, type the mark-up amount or percent. If Price Discount Amount or Price Discount % is selected at the Pricing Method field, type the price discount amount or percent. Click on Calculator button to enter an amount or percentage.

Now, users have to assigned the above created Pricing code to the Inventory Item; Say to item code ‘D100’.So by default the item  will take pricing as per the assigned pricing code in Sales Order.

Say for an example; we would calculate the Price of an Item by adding margin Percentage amount into Cost of the Item based on entered quantity in the sales order.

1. In below screenshot, we have assigned the created pricing code to the Inventory Item.
2. Now, we will assign it to the same price level in order to follow the pricing info mentioned in Price code Maintenance.
3. Let’s see an impact of above procedure by creating a Sales order with Item for which have assigned the price code and the Customer ‘01-AVNET’ for which we have assigned Price Level ‘A’.
As we can see, Standard Cost of the selected Item is $450.00 and we have entered quantity as 10. So the calculation as per the defined criteria in price Code Maintenance is as follows;

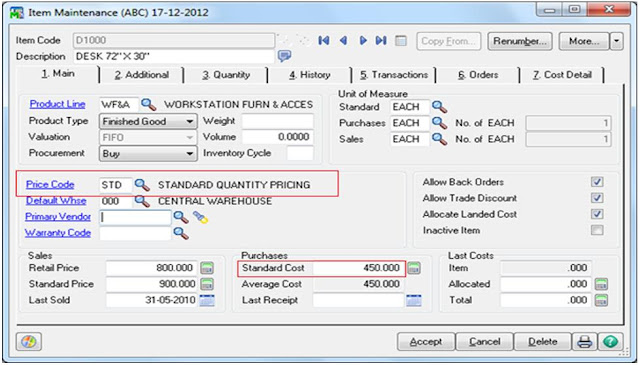
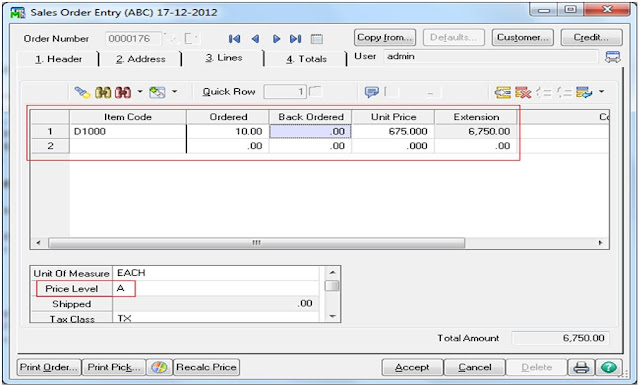
Unit Price = Standard Cost + (Standard Cost*50/100)
                 = 450 + (450*50/100)
                 = $ 675

As per same method, we can calculate price of Item by other method like as Cost Margin Amount, Discount Percentage and Discount Amount.

Data Integrity and Optimization tools in Sage 100 ERP

$
0
0

Here in this blog, we are going to look at one more feature of Sage 100 ERP (formerly known as Sage MAS 90/200 ERP) which helps in maintaining data accurately and optimized the same. We can use this feature to rebuild the primary module files. Since it updates keys of various master files, any in-correct use of it may create more data corruption issues. Hence, it is advised that this feature should be used only under direction of an expert.

Before we dig more into it, let us look at some below situation that can cause the data/performance issue:

* Power failure.
* Improper shutdowns, such as caused by power outages or performing a hard restart: pressing and holding the power button, the restart button.
* Hardware problems or failures, including hard drive failures, bad sectors, bad RAM, etc.

Though Sage 100 ERP is a very robust system, at times, due to above unknown reasons data in the system gets corrupted. We can handle the data corruption issues by using Sage 100 ERP System’s inbuilt data correction features.

Integrity Check:

1. In this process it scans the selected list of files for the data in-consistencies.
2. During this whole process, it performs a complete validation of each record, verifies the data dictionaries, and checks for read/write capability.
3. When the process completes, a text file is launched in Notepad providing information about the integrity check.
4. In case of errors, a message box appears each time to rebuild the file. All the empty required field found during the entire process are documented so that users can manually repair the file.

Optimize file:

1. As name suggests, it helps in speeding-up the Sage 100 look-up / update/ retrieval/ traversing processes.
2. In this, all the data is re-written into a new file. It also removes un-necessary excess empty data blocks, and arranges the primary keys in alpha-numeric order.
3. A text file is launched in Notepad providing information about the file optimization.

Note: This feature is not provided in Sage MAS 200 ERP SQL versions.

Rebuild and Optimize Sage 100 Key Files

$
0
0

In our previous blog, we have explained about “Data Integrity and Optimization tools in Sage 100 ERP”, now we will see how we can use “Rebuild Key Files” feature in Sage 100 ERP (Formerly known as Sage MAS 90/200 ERP).

To utilize the Rebuild key feature follow below mentioned procedures;

1. Login to Sage 100 company file with administrative rights
2. Click on “Library Master -> Utilities -> Rebuild Key Files”, a window with a warning message would appear; click on “OK” button to view the below screen.
3. Select the company code and module code.
4. Then, select the check-boxes as whether you want to check the inconsistencies in the data file or you want to optimize the file. In our case, we have selected both.
5. Now select which data file you want to check and optimize. Here we have selected the AR_Customer file.
6. Now, everything is in place and set, we can start with the process by clicking on the Proceed button.
7. Once, the process is completed, a file is shown as below containing the list of issues which needs attention.
Thus the process has been completed. If you have any queries regarding Sage 100 ERP or need any assistance, do write to us at sage@greytrix.com.

Implementing Password Policy in Sage 100 ERP

$
0
0

Sage 100 ERP (formerly known as Sage MAS 90/200 ERP) is a robust Accounting system having a strong range of features which provides additional security options for protecting important data in the system. In this blog, we will be discussing on one of such security feature of Sage 100 ERP system.

Say for an example, we have an important accounting data in our system and do not want users from other department to see it. Hence, we can protect it by implementing password policy in Sage 100 ERP.

To implement password policy, users have to follow below guidelines;

1. Login to Sage 100 system with Administrative rights, and navigate to System Configuration à Security tab and check the “Require all Users to Enter a Password” checkbox in the Internal Security block.
(Note: Unified Logon option must be kept unchecked)
2. Now, select other options from the block and fill in the text boxes with the relevant information’s.
a. Require all User Passwords to be System Defined Strong Passwords: Provide a strong password to the system, so other users could not access Sage 100 System. For Example: Password could be combination of letters and numbers, say P@p3rCa$E20.
b. User Defined Passwords must be of a Minimum Length: Select this check box to set minimum length of password. As defined at the Length field, user needs to enter a minimum length (greater than zero) for password for his Sage 100 System.
c. Force Password Change after a Set Number of Days: Select this checkbox if Administrator wants users to change their password after certain interval of time. Enter the number (greater than 0) of days, in which Sage 100 users need to change their passwords.
d. Lock Out User after a Set Number of Invalid Logon Attempts: Selecting this check box will lock out user after a set number of incorrect login attempts. Enter the number (greater than 0) of allowed attempts in the adjacent text field.
e. Unlock User after a Set Number of Minutes Elapse from the Last Invalid Logon: Select this check box to unlock users after a specified number of minutes, if they have been locked out as a result of surpassing the number of attempts to log on. If this check box is cleared, all locked accounts must be manually unlocked in the User Maintenance window by clearing the User Account Locked check box. Enter the number (greater than 0) of minutes in the adjacent text field.
Note: Expired user accounts must be re-activated in User Maintenance and they are not affected by these field.
By using the above simple steps one can easily implement password policy in Sage 100 ERP for the Sage 100 Users.
Note: These settings would be applicable for all Sage 100 companies.

Advanced data Security in Sage 100 ERP

$
0
0

In our previous blog, we discussed about “Implementing password policy in Sage 100 ERP”, so it would be useful for users to safeguards their confidential data in Sage 100 (formerly known as Sage MAS 90/200 ERP) system. In this blog, we will be focusing on security option in Sage 100 ERP to enhance data security.

To illustrate it better, let us assume that we have a Data Entry operator who would be responsible for adding the Sales Orders in Sage 100 ERP. We can limit this User to only use the “Sales Order Entry” form, thus restricting him from accessing any other modules /information in the system.

To apply this setting, we need to follow below mentioned points:

1. Login to Sage 100 System with Administrative privileges
2. Click on the “Role Maintenance” to create Roles (security is handled through roles). Let’s take an example “SOOperator”and assign tasks/rights.
3. Then navigate to “User Maintenance” screen and create user “SOOPERATE”, and assign the role “SOOperator” created to this user.
4. Click on “Accept”, user would be created. Now exit Sage 100 system and re-login with the newly created user “sooperate”.
5. Now if you try to access any task/program other than “Sales Order -> Main -> Sales Order Entry”, you will get the below screen.
6. Similarly, Administrator(s) can create/add/modify and assign rights to view/edit data in the modules to users depending on their work type/responsibility.

Hence, by using these easy one way settings, administrator can easily implement security and thus would enhance data security in Sage 100 ERP System.

Use fractional factor values in Unit of Measure for Items in Sage 100 ERP

$
0
0

Sage 100 ERP (formerly Sage MAS 90/200 ERP) supports various types of items such as miscellaneous Items, Non-Stock Items, Stock Items, etc. To maintain Stock Items, one has to maintain Unit of Measures (UOM). In Sage 100, we can make use of UOM feature by defining the UOMs in “Unit of Measure Conversion Maintenance” screen and set its factor (i.e. stocking units) values as per the requirement.

Users can follow below mentioned steps to use fractional values of UOM conversions;

1. In order to set the fractional factor value of UOM, first user needs to inform the system that they wish to use the fractional values in UOM.
2. To do so, just set the decimal places against “Unit of Measure Conversion” text box as “3”(you can have any number as per your requirement). You can launch the screen from “Common Information-> Setup->Common Information Options”.

3. Now, go to “Unit of Measure Conversion Maintenance” to create an UOM Code. Users can set the conversion factor as set above.
Hence, with simple easy steps, user can easily set the system to use fractional values in The Unit Of Measures. 

MapQuest Integration in Sage 100 ERP

$
0
0

Sage 100 ERP 2013 (formerly Sage MAS 90/200 ERP) has provided a new feature, which integrates it with MapQuest. MapQuest provides some extent of street-level detail and driving directions for a variety of countries. Users can check if their country is available via a pull down menu on the MapQuest home page.It will help user to view the address location of Sage 100 customer entered in the Customer Maintenance screen.


Now let us see how it works:

1. Navigate to Sage 100 >> AR Customer Maintenance screen.
2. Check the main address of Customer.
3. Click on highlighted button near the Address Line 1
4. Once clicked, it will open a browser and would takes user to http://www.mapquest.comand would open the location of the address entered.

However, it helps Sage 100 User to get brief info about the address for Sage 100 Customer and also helps to verify whether customer has provided a valid address or not.

Create Sales Order in Sage 100 Standard ERP with Special Items

$
0
0

In this blog, we will see how to create a Sales order in Sage 100 ERP (formerly Sage MAS 90/200 ERP) using Special Items as its Line Items.

In Sage 100 ERP, Users can use Special Item Code to those Inventory parts that have been written off or slow moving but are still sellable. This is done by assigning ‘*’ sign to the Inventory item in the SO or Invoice entry detail Line * (example: #12345).

In the below example, we have explained the process in detail;

1. We will create a Sales Order against the Customer  “Abercrombie, Kristy”
2. Here, we are selling an Item “Brass Hinges” to this Customer.
3. Inventory activity for this particular Item has been slow moving with only sales of 5 units in the previous Fiscal year.  Therefore, we would be selling it as a Special Item to this Customer.
4. In the above Screenshot, we have prefixed an asterisk sign before the Item Code as highlighted in the detail Line.
As we have entered Line item as Special Item, it takes the codes for Sales Account and Cost Account as it has been set at Special Item sales and Special Item COGS Accounts in Sales order >>Sales Order options >> Menu screen.

The main purpose of using special Items in Sales order is to highlight those items from stock which are moving quite slowly and lagging behind in sales as compare to other inventory Items. However Account manager can track the invested cost and sales of special items differently than normal inventory items.

GL Posting for Sales Orders with Special Items in Sage 100 Standard ERP 2013

$
0
0


In this blog, we would discuss about the posting process of G/L Accounts, when Sales order is created in Sage 100 ERP (formerly Sage MAS 90/200 ERP) with special Items as its Line Items.

As discussed in our previous blog Create Sales Order Entry with Special Item, Sage 100 users can use a Special Item Code to those Inventory parts that have been written off or slow moving but are still sellable. This is done by assigning ‘*’ sign to the Inventory item in the SO or Invoice entry detail Line * (example: #12345).

For starters, user need to ensure that Integrate General Ledger option is checked along with setting of appropriate Default G/L Accounts in Sales Order option Menu.

Say for an instance, we create a Sales Order entry against the Customer “Bristol, Sonya”.

Here, we are selling an Item “cabinets” to the Customer. We have classified it as a Special Item since the transaction activity against it has been slow in this Fiscal year. We have prefixed an asterisk sign for the Item Code Cabinets in the Line Item; this changed the Item Type into “Special” type.

Note:Here, user needs to make sure the Drop Ship option against the Item is unchecked. If it is drop shipped there would be no COGS or Sales Accountposting during invoice posting in Sales Order.  The only posting is sales and AR.

1. We would create an Invoice against the created SO for this Customer and will do complete shipment for the same.

2. Then run Daily Sales report/Updates along with Daily transaction register to affect the G/L accounts posting.
3. After posting, we will drill down to the maintenance Screen to G/L Account set in the Sales Order option.
4. Here, Invoice amount has been successfully posted to COGS account set in Sales Order option through SO journal.

However Account manager can highlight the account statistics sales and invested cost on the Items which are slowing moving from Stock and need to focus on the sales of such items.

Apply AR Prepayments on Invoices in Sage 100 ERP

$
0
0

In our previous blog, AR Prepayment Entry in Sage 100 ERP”, we discussed about how to create a new AR Prepayment in Sage 100 ERP (formerly Sage MAS 90/200 ERP).

Now, in this blog, we will discuss how to apply prepayments to Invoices.

To apply AR Prepayment on Invoices in Sage 100 ERP, follow below mentioned steps:

1. Navigate to “Accounts Receivable >> Main” menu.
2. Click on “Cash receipt Entry” option and open “A/R Cash Receipts Entry Batch” screen.
3. Enter details such as Batch number, Comments and click on “Accept” Button.

4. On “Cash Receipts Deposit” screen, enter details such as “Deposit number”, “Description”, “Bank Code”, “Deposit date”, etc. Do not enter anything in “Cash Deposit Amount” and “Credit Card Deposit Amount” and click on “Accept” button.


5. Cash Receipt Entry” screen will appear. On this screen, enter “Customer Number” with “Check Number”. Do not enter anything in “Amount Received” field and keep it as 0.
6. Now navigate to Lines tab; on first line, select existing prepayment to be applied and enter the Amount that needs to applied in “Amt Posted” field.
7. In second line, select the invoice to which we want to apply the prepayment and enter the Amount that needs to be paid in “Amt Posted” field and Click “Accept” button.
Note:Make sure that Posting Balance and Total Posted fields are 0. If they are not, then it gives below error message.
In similar way, users can apply prepayments against the invoices in Sage 100 ERP.

Auto Increment Customer Number in Sage 100 ERP

$
0
0

In Sage 100 ERP, there are two methods to assign a customer Number while creating a new Customer in ERP:

- Assign Customer Number manually
- Set New Customer Number on Auto Increment mode.
Sage 100 users must be aware that they can enter new Customer Number manually in Sage 100 up to 10 characters (including Division number) as per the standard setting of Sage 100 ERP 2013.
However, in normal business scenarios, when there are multiple Sage 100 Customers need to create frequently; it becomes tedious task for Sage 100 user to assign customer numbers manually.
Therefore, in such case to save time and complexities while generating customer number, sage 100 has option to generate Customer Number by just one click.
So let’s see the procedure to achieve the same;
1. Navigate to Sage 100 >>Account Receivable >>Setup >> Account Receivable options.
2. Switch to Entry tab and check status of ‘Auto Increment Customer Number’. Initially, in Sage 100 new company, this checkbox is in unchecked status.
3. Here, we need to change status of checkbox to ‘checked’ in order to enable the Field ‘Next Automatic Customer Number’.
4. Put value for ‘Next Automatic Customer Number’. User can enter up to 7 digits or can put the code as alphanumeric value.
Note: Make sure that last charterer of entered value is numeric, so it can be incremented by 1.
5. We have set the next customer number as ‘0000001’. So now, let us see how it works by creating new Customer by this numbering setting.
6. Navigate to Customer maintenance screen and click on newly available ‘Next Customer Number’ button the “Customer Number field”.
     
7. Select Division and click on OK Button. The next set number will get appeared in Customer number Field.
8. We would be able to view the number which we had set in AR option screen has been appeared in Customer Number field.
However, the number gets auto increased by 1, whenever Sage 100 user creates New Customer by ‘Next Customer Number’ button.

Remove Zero Balance Invoices from Open Invoice List of Customer Inquiry in Sage 100 ERP

$
0
0

While navigating through customer records, when we check the open Invoice list, we see many invoices, which are closed OR paid. Finding an open invoice among the open invoices, which are closed/fully paid (i.e. zero balance invoices) sometimes, becomes quite difficult.
To avoid this scenario, there is one setting (i.e. “Display Invoices with Zero Balance” ) in “AR Options” screen of Sage 100 ERP, which when unchecked, makes the system to show only open invoices under Invoice tab in Customer Inquiry screen. 
To illustrate it better, let us take an example. Suppose, we have a customer “01-ABF” of which we want to see list of pending invoices. Hence, navigate to Invoice tab in Account Receivable >> Maintenance >> Customer Inquiry.
To remove close /zero balance invoices from the list, just un-check the “Display Invoices with Zero Balance” option available on the main screen of the “Accounts Receivable >>Setup >>AR Options screen.
Now, when we re-navigate to Customer Inquiry screen and check the pending invoice list for the same customer, it will show only pending Invoices, instead of collection of pending and close invoices.
As a result, users can now find only the pending invoices in the Customer Inquiry screen, which would help them to process Invoices in an effective manner.

Enable Customer Pricing Feature in Sage 100 ERP

$
0
0

With release of Sage 100 v4.5 (formerly Sage MAS 90/200 ERP), Sage has added a new feature in Accounts Receivable i.e. Customer Pricing. You can use this feature to define price level for each customer. These set price levels are used when we enter sales orders or create 1-step sales order invoices for the customer.
These price levels can be set from “Price Level By Customer Maintenance” screen, which is present under “Modules >> Accounts Receivable >> Setup”. By default, the screen is disabled, which can be enabled by following the below steps -  
1. Navigate to Sales Order Options screens (Modules >> Sales Order >> Setup >> Sales Order Options) and check the “Enable Default Price Level By Customer” checkbox available on the “Line entry” tab and save it.
2. Now, go to “Accounts Receivable >>Setup“and try to open “Price Level By Customer Maintenance” screen, you will be able to open the same.
In order to use this feature, you must have Sales Order module active in your Sage 100 system.
In addition, when this feature is disabled, user will get a message saying “Setup indicates that this option is not available on your System” while trying to access the screen.
As a result, we can enable the customer price level feature for the customer in Sage 100 ERP.

Clear Admin level passwords in Sage 500 ERP

$
0
0

Many a times, we do not remember Admin level passwords set to access Sage 500 (formerly Sage MAS 500 ERP) database. It causes a significant delay in accessing and working on the system especially in critical situation.
In this blog, we will discuss the way to tackle such situation and continue with an easy access the system. To Login to Sage 500 database, when you are unaware of the password set, follow below mentioned steps;
1. Run Database Synchronization utility program from the utilities, by default it path would be Start >>All Programs >>Sage Software >>Sage ERP 500 >>Utilities >>Database Synchronization Utility.
2. Select SQL Server name, where Sage 500 database is stored; then enter the SQL login credentials and click on Proceed.
3. Once you proceed with proper credentials the below form will appear.
a. Then, select the desired application database of Sage 500 and select the first option of the synchronize logins.
b. Select the option ‘Check database Reference as shown above screenshot and click on Proceed.
This will clear all the Admin level users passwords which had been set for Sage 500 database resulting in successfully accessing the database and companies.

Modify Existing Lookup in Sage 100 ERP

$
0
0
Sage 100 ERP is one of the popular ERP systems in mid-level businesses. It provides several small, but useful features that come handy for Customer’s specific needs. In this blog, we will discuss one of such feature i.e. customizing standard Sage 100 look-up screens.
Before we go ahead, let’s take a look at some useful information about it;
a) Users can create up to 99 unique lookup views based on company code and user code.
b) While creating lookup view, User can define view as default in which they can add, remove, or modify fields in lookup, add or remove filters, as well as define several other settings.
c) After creating a lookup view, users can modify or delete view at any time.
To illustrate it better, let’s take an example by customizing a standard look-up screen of Item look-up.
1. Open the Item list Look-up from the Item Maintenance Screen .
2. Click on the “Custom…” button, below screen would appear
3. Click on Next and select the list of columns that you want to show
4. Then, click on “Finish” button, you will get the newly created look-up as per your requirement.
Users can use these customized look-ups to process the records a little faster which in turn help them increase their efficiency. You can customize almost all the standard look-up that is available in Sage 100 and customize them as per your requirement.

Item Warranty Maintenance in Sage 100 ERP

$
0
0
Selling is an integral part of a business firm, which may include items, services, etc. All these are prone to get damage, but you can attract your customer by giving them warranty. A warranty is a guarantee or promise, which provide assurance to your customer about your products/services that they are hoping to consume.
All this helps in building a consumer base as well as a brand name in the market. There is a provision in most of the enterprise systems which allow user to track/maintain the warranty of products/services that you have to offer and Sage 100 is not an exception. Here we are going to discuss the same as how can we set up warranty feature and use it in Sage 100.
We can assign Warranty code to each inventory item and specify the number of days to calculate warranty expiration date. In order to start this feature, follow below points;
1) Make sure that “Enable Warranty Tracking” option is checked in Item Maintenance option (Inventory Management ->Setup-> Inventory Management Options). If this option is not check, then you will get message “Setup indicates that this option is not available on your system” when try to open the Warranty Code Maintenance Screen.
2) Now navigate to Inventory Management ->Setup -> Warranty Code Maintenance screen and add the warranty codes along with warranty days and description.
3) You can assign warranty code to item from the “Inventory Management ->Main-> Item Maintenance” screen.
4) Warranty expiration date is calculated automatically as per the warranty code set for the item. We can use Ship Date / Invoice Date from which we have to start the warrant tracking.
By using above mentioned simple steps, user can maintain warranty for items, warranty code etc. You can also make sure that, your customers are getting benefit of using your products. This will also help you to create a customer loyalty and even make money out of it by charging users for extended warranty periods.

Setup Multiple Warehouses in Sage 100 ERP

$
0
0
In this blog, we are going to discuss how to setup multiple warehouses in Sage 100 ERP. Sometimes, user wants to create multiple warehouses in Sage 100 as they have multi warehouse present physically in Business transactions. So it becomes necessary to maintain the multiple warehouses in ERP System as well.
Let’s see how to set up the multiple warehouses in Sage 100.
1) In Sage 100, navigate to Modules >> Inventory Management >> Setup >> Inventory Management option.
2) In Inventory Management option screen, go to Main Tab and see if check-box status of ‘Require Multiple Warehouses’ is checked or not.
As for the above case; option is unchecked. So in such case, there will be only one single warehouse code in Sage 100 ‘000’and user won’t be able add new warehouse code in System.
3) Hence, user has to check the “Require Multiple Warehouses” check box in order to activate the option to create multiple warehouses.
Once user checks the same, he can notice the selection of ‘Default warehouse code’ becomes enables for users to select Default warehouse for ‘Company code’. Now user will be able to create new Warehouse code in Modules >> Inventory Management >> Setup >> Warehouse code maintenance

Purge Customer Invoice history in Sage 100

$
0
0

Continuing from our previous blog Purge Account Receivable History in Sage 100, today we going to see the how to purge customer Invoice history into Sage 100. 
Steps to Purge Customer invoice History.

  • Open the sage 100 Company and go to Account Receivable ->Utilities ->Purge Account Receivable History. The below screen will appear . Here we can see three sections - 
 
  • Go to first frame and select checkbox “Remove Invoice History” and select the date till you want to clear the history. If you proceed with selected checkbox then only historical invoices only will get removed from the Sage 100.
  • If you proceed by selecting the checkbox "remove Deleted Invoice Only Option", then all the Sage 100 Invoices with Deleted status gets removed from the Sage 100 Company database.
  • You can proceed with both options by selecting both the checkboxes. Click on "proceed" button. However, it will remove the entire Customer's Historical invoices as well as deleted invoices till the selected  date  from Sage 100 Company database.

In our next blog segment, we shall see about how to purge customer’s deposits History           


Purge Customer Deposit History in Sage 100

$
0
0


Continuing from our previous blog ofPurge Customer Invoice history in Sage 100, today let’s see how to purge the customer deposits history in Sage 100.


Steps to purge customer Deposit History.

Open the sage 100 Company and go to.
  •     Account Receivable -> Utilities -> Purge Account Receivable History.    
  • Click on the "Remove Deposit History" Check-box.
  • Select the date till you want to clear the history.
  • Click on the "Proceed"tab.
  • The above process will clear the entire Customer's deposit History till the entered date

In our next blog segment, we shall see about  How to Purge Customer Sales History in Sage100.


Purge Customer Sales history in Sage 100

$
0
0


Continuing from our previous blog Purge Customer Deposit History in Sage 100,today we are going to discuss about how to purge customer sales history into Sage 100.

Steps to purge Customer Sales History data.


Open the sage 100 Company and go to Account Receivable àUtilities àPurge Account Receivable History. Go to third frame of appeared screen. 

Remove Customer Sales History

  • Click on the "Remove Customer Sales History" Check-box.
  • Select "Fiscal year to remove History by" from the drop-down.
  • Click on the Proceed tab.It will clear Sales History from the database till the entered date.


        Remove Salesperson History:


  • Click on the “Remove Salesperson History “check-box. 
  • Select “Fiscal Year to remove History By” from the drop down 
  • Click on the Proceed tab. It will clear Sales history from the database till the entered date. 


  Remove Cash Receipts History:  


  • Click on the “Remove Cash receipts History “checkbox.
  • Select “Fiscal Year to remove History By” from the drop down. 
  • Click on the Proceed tab. It will clear Sales history from the database till the entered date. 


The “Fiscal year to remove history by” field is enabled only if the ‘Remove Customer Sales history/ Remove Salesperson History/ Remove Cash Receipts History by’ check-box is selected
This check box is available only if the value entered in the ” Years to Retain customer History” field in the Accounts Receivable Options window is greater than 2. To open the Accounts receivable Options window follow the below path:
 

Account Receivable -> Setup -> Account Receivable Options->History Tab


Viewing all 333 articles
Browse latest View live